2. Protect Against Unwanted Mail Sources
In addition to
protecting your organization from messages that are considered spam or
that have inappropriate content, you can also protect against specific
mail sources. This is useful in situations where there is a specific
attack against your organization or if there are senders you want to
ignore at the organization level.
2.1. Block Mail from Specific IP Addresses
You can choose to block all
messages sent from a specific set of IP addresses using an IP block
list. IP block lists are typically configured on Edge Transport servers,
since they are Internet-facing. However, if you install the antispam
features on a Hub Transport server, you can configure IP block lists on
the Hub Transport server as well.
When adding IP addresses to
the IP block list, you can add a single address, a subnet, or a range
of addresses. To block an IP address, you use the Add-IPBlockListEntry
cmdlet in the EMS. The following command blocks connections from the
10.0.0.1 address. In this command, the IPAddress parameter is specified
to indicate that we are blocking a single IP.
Add-IPBlockListEntry -IPAddress 10.0.0.1
When blocking a subnet or a range of IP addresses, you should use the IPRange parameter. The following example blocks everything coming from 10.0.0.1–10.0.0.100:
Add-IPBlockListEntry -IPRange 10.0.0.1-10.0.0.100
After you have configured the IP addresses to block, you can run the Get-IPBlockListEntry cmdlet to view the configuration. To remove IP addresses from the block list, use the Remove-IPBlockListEntry parameter and specify the blocked IP address entry that you want to remove.
2.2. Verify That Senders Are Valid
In Exchange, you can also
block mail from specific senders. You can set up a filter based on the
sender's IP address or domain name. In addition, you can check whether
the sender of the message is valid and whether the message is spoofed.
This functionality is exposed in the two Exchange features called Sender
Filtering and Sender ID.
Sender Filtering and Sender
ID are enabled as part of the antispam feature set in Exchange. These
two features work together to ensure that the headers on an email
message are not spoofed (that is, they verify that the message is really
from who it says it's from) and that the message is from a sender you
want to accept mail from.
2.2.1. Prevent Spoofed Messages
To ensure that messages
aren't being spoofed, you can configure Sender ID. Sender ID will
compare the sender's address against the Sender Policy Framework (SPF)
record in the sender's DNS domain name. The Sender ID status is set on
the message to indicate the results of the SPF record lookup. This
status is used in the calculation of the SCL of messages.
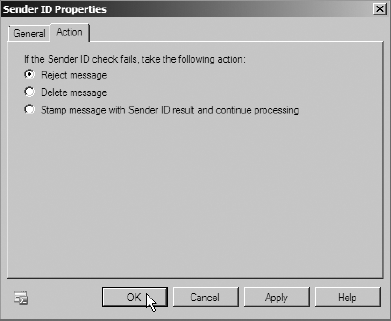
You can also configure the
Transport server to perform certain actions based on the Sender ID
status. You can have the server reject the message, delete the message,
or just stamp the Sender ID value on the message. By default, Exchange
just stamps the value onto the message.
You can configure these settings in the EMC by using the following steps:
Open the EMC and browse to either the Organization Configuration => Hub Transport node or the Organization Configuration => Edge Transport node in the Console tree, depending on which server you are using for transporting Internet email.
In the Work area, click the Anti-spam tab to open a list of available antispam options.
Double-click on Sender ID in the list. The Sender ID Properties dialog box is displayed.
Select the option that represents what you want to happen after a Sender ID check takes place. In Figure 1, the Reject Message option is being configured. This will send a rejection notice to the sender of the message.
Click the OK button to close the Properties dialog box and make the change.
You can also configure the Transport server to reject spoofed messages by using the Set-SenderIDConfig cmdlet with the SpoofedDomainAction parameter. You can set this parameter to either Reject, Delete, or StampStatus. The following command will ensure that messages from spoofed domains are deleted:
Set-SenderIDConfig -SpoofedDomainAction Reject
2.2.2. Block Messages from Certain People or Organizations
Now that you've verified that
the message isn't spoofed, you can choose to block messages from people
or organizations that you don't want to hear from. To do this, you use
the Sender Filtering feature. You can configure Sender Filtering to
either flat-out deny the message or to accept the message and mark that
it's from a blocked sender. The SCL of the message will be updated
appropriately.
To configure which senders are blocked, use the following steps in the EMC:
Open the EMC and browse to either the Organization Configuration => Hub Transport node or the Organization Configuration => Edge Transport node in the Console tree, depending on which server you are using to receive mail from the Internet.
In the Work area, click on the Anti-spam tab to open a list of available antispam options.
Double-click on Sender Filtering in the list. The Sender Filtering Properties dialog box is displayed.
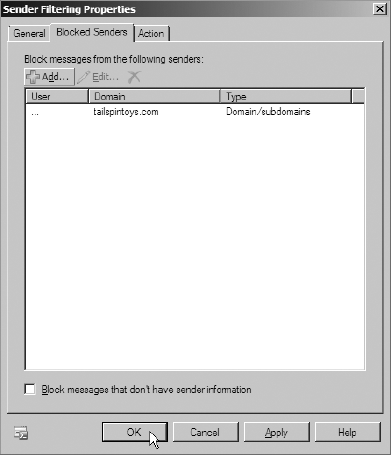
Click the Blocked Senders tab.
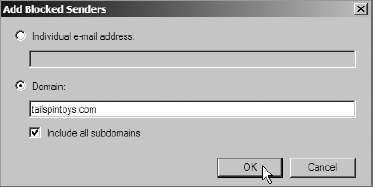
Click the Add button to add senders to the list that you want to block. This launches the Add Blocked Senders dialog box.
In
the Add Blocked Senders dialog box, add individual email addresses that
you want to block, or if you want to block an entire domain, select the
Domain option and type the name of the domain, as shown in Figure 2.
When
back in the Sender Filtering Properties dialog box, add any additional
addresses that you want to block and then click OK to close the
Properties dialog box. This configuration is illustrated in Figure 3.
You can also use the Set-SenderFilterConfig
cmdlet in the EMS to enable Sender Filtering and configure the
addresses that you are blocking. You can block an entire domain using
the BlockedDomains parameter or a single sender using the BlockedSenders parameter. The following command enables Sender Filtering and blocks messages from anyone in the tailspintoys.com domain:
Set-SenderFilterConfig -Enabled $true -BlockedDomains
tailspintoys.com
2.3. Prevent Internet Users from Sending Email to Distribution Groups
You may have
distribution groups inside your organization that you only want internal
employees to have access to send email to. You can block these
distribution groups from receiving Internet email by using Recipient
Filtering to block messages from the Internet that are destined to a
certain address. For example, suppose you have a distribution list
called [email protected]
that you don't want people on the Internet to send mail to. You can use
the following steps in the EMC to ensure that Internet users can't send
mail to the [email protected] distribution group:
Open the EMC and browse to either the Organization Configuration => Hub Transport node or the Organization Configuration => Edge Transport node in the Console tree, depending on which server you are setting up the recipient filtering on.
In the Work area, click the Antispam tab to open a list of available antispam options.
Double-click on Recipient Filtering in the list. The Recipient Filtering Properties dialog box is displayed.
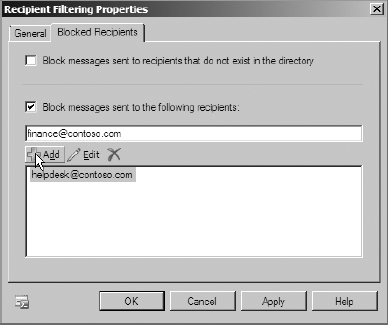
Click the Blocked Recipients tab.
Select
the check box Block Messages Sent To The Following Recipients. Type the
address of the distribution group in the field below the check box and
then click the Add button (Figure 12.9).
Click OK to close the Properties dialog box and make the change.
You can also add the
distribution group to the recipient filtering list in the EMS. Use the
Set-RecipientFilterConfig cmdlet with the BlockedRecipients parameter.
The following EMS command accomplishes the same thing that we just
performed in the EMC:
Set-RecipientFilterConfig -BlockListEnabled $true -BlockedRecipients [email protected]